Which Bobbin Does My Sewing Machine Need? Class 15, Class 66 and L-Style Explained
As an Amazon Associate we earn from qualifying purchases. This page contains affiliate links — if you buy through them, we earn a small commission at no extra cost to you.
The right bobbin for your machine isn’t determined by a class number on the packet, but by whether its height and flange profile match the hook race in your machine. Class 15, 66, and L-style are just shorthand for these physical measurements. Get the fit wrong, and the bobbin will wobble, creating tension problems that mimic more serious faults.
Bobbins are easy to overlook. They’re small, they sit under a cover, and the packet probably said “Class 15” without explaining what that means. The trouble is that Class 15, Class 66 and L-style bobbins all look roughly similar, but they are not interchangeable. Put the wrong one in your machine and it will wobble in the slot, creating exactly the tension problems you’re trying to fix. This is one of those faults that looks like a service job but is actually a five-minute part swap — if you know which part to buy.
Here’s how to work that out without a guess.
Why the Bobbin Causes Problems (And Why It Gets Overlooked)
When a domestic machine loops, nests thread or skips stitches, the cause is usually a threading issue, needle problem, incorrect bobbin, lint buildup, tension setting, or fabric mismatch. The standard troubleshooting sequence is to rethread with the presser foot raised, fit a new needle suited to the fabric, clean lint from the bobbin area, and only then adjust the tension dial.
📺 Watch: How To: Pick Up (Collect) Bobbin Thread (Sewing for Beginners)
The bobbin is a common culprit because one that doesn’t sit flush in its slot — being the wrong type for your machine — creates uneven tension without obvious signs. The top thread looks fine. The needle is new. Yet stitches skip, tension feels off, and thread bunches underneath. The wobble is to blame. Swapping to the correct bobbin often clears persistent tension issues that had no other apparent cause.
The mistake is buying by name rather than fit. “Class 15” appears on packets for different bobbin designs, and the name alone doesn’t guarantee a correct fit. Even within the same brand, models can use different bobbins — a Singer Heavy Duty might need a different bobbin to a Singer Simple. Your manual lists the bobbin type, but rarely explains why that specific type matters.
Before considering a service call or assuming machine failure, check the bobbin. It’s the most affordable fix for a frequent cause of tension trouble.
Measuring Your Bobbin: The Physical Differences
Forget the class names for a moment. The sure way to identify the right bobbin is to measure the one that fits your machine properly.
📺 Watch: Singer Heavy Duty 4423 4 Threading & Winding a Bobbin
Several bobbin styles are found in UK home sewing machines, with Class 15, Class 66, and L-style being common examples. However, models may use other types like 15J, so always check the manual.
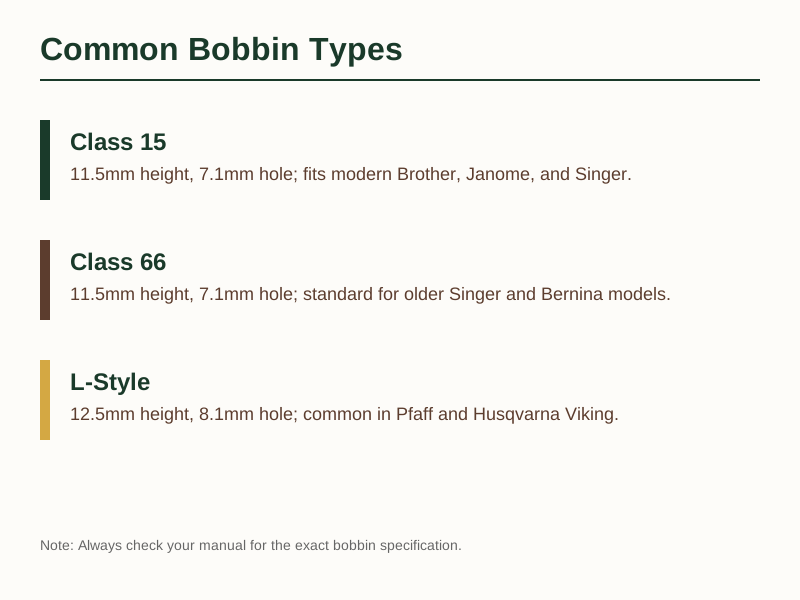
Class 15 — roughly 12mm high and about 20mm across, with flat top and bottom faces. Many modern machines use a bobbin of this approximate size. Numerous Brother and Janome models are compatible, along with many recent Singer machines. The manual for your specific model is the final authority.
Class 66 — about the same size as a Class 15, but its top and bottom faces are slightly curved where the Class 15 is flat. That small difference is exactly why the two get mixed up. They are not interchangeable. You might find Class 66 bobbins in some older Singer machines and certain other models.
L-style — This type is generally taller and has a different profile. Some Pfaff and Husqvarna Viking models use L-style or other manufacturer-specific bobbins. The size difference is often significant enough that an L-style bobbin won’t sit correctly in a slot meant for a Class 15 or 66.
The problem is mechanical: an ill-fitting bobbin won’t sit flat. A wobbly bobbin disrupts thread feed with each stitch, throwing off the tension balance between the top thread and bobbin thread. This imbalance manifests as skipped stitches, thread nests underneath, or broken thread — symptoms easily attributed to other issues.
To measure your bobbin, use a ruler or callipers. Measure the full height from the flat top to the flat bottom (ignore the curved winding surface). Then measure the centre hole diameter. Jot down the figures. Comparing these to known specifications is the most reliable test.
Identifying Your Bobbin System
Understanding how the bobbin sits in your machine is key. The bobbin class must match the machine’s physical slot, regardless of the loading mechanism.
📺 Watch: How To: Insert (Load) a Bobbin (Sewing for Beginners)
Top-loading (drop-in) bobbins sit horizontally under a removable cover, typically on the top or needle-plate area of the machine. You drop the bobbin in, pull the thread through a guide channel, and close the cover. This built-in case design is common in many modern domestic models. The bobbin case is not removable separately.
Front-loading bobbins use a removable bobbin case, which is accessed according to the machine’s design. The bobbin drops into this separate case, which then slides or clicks into the machine. This system is found in various machines.
The bobbin class (e.g., Class 15, Class 66) is determined by the slot dimensions in the machine, not by the loading system. Some top-loading machines take Class 15; some front-loading machines take Class 66. Your manual specifies the required class, but physical measurement provides the same answer if the manual is lost.
Quick check: Can you see the bobbin through a clear plastic cover without removing a case? That’s likely top-loading. Do you pull out a separate metal or plastic case? That’s front-loading. The system affects loading technique, but the bobbin class is defined by slot dimensions.
Selecting the Correct Bobbin
With the correct class identified, the choice is between branded and generic bobbins.
Singer machines — Many Singer models use Class 15, but Singer also uses other classes; check the manual. Genuine Singer Class 15 Bobbins (paid link) are listed for select Singer machines and several other makes that take Class 15, and they are clear plastic, allowing you to see the thread level. A known fit is valuable, especially if you’ve battled tension issues from a poorly fitting bobbin. Generic bobbins can vary slightly, so searching specifically for Singer Class 15 bobbins is a safer bet than choosing the cheapest option.
View Singer Class 15 Bobbins on Amazon → (paid link)
Brother machines — Many Brother models use a similar-size bobbin, but verify the exact model and part number. Genuine Brother bobbins are engineered for a precise fit. If generic bobbins have caused stitching issues, switching to genuine ones is an inexpensive test. Note that not all Brother machines use the same bobbins; the brand has used different specifications over time, so always check the manual for your specific model.
Janome machines — Check the manual for your specific Janome model, as the brand has used different bobbin specifications over the years.
Pfaff and Husqvarna Viking — Some Pfaff and Husqvarna Viking models use L-style or other manufacturer-specified bobbins; check the manual. The size difference is typically significant.
Budget options — Generic Class 15 bobbins are cheaper and can work well when correctly matched. The risk is compatibility: Class 15 and the similar Class 15J are not interchangeable, and multipacks might contain the wrong type. If buying generic, verify the dimensions against your machine’s needs before use. The small saving isn’t worth it if the wrong type ruins your tension again.
Maintaining the Bobbin Area
While the bobbin itself needs little care, the area around it demands attention. Lint, thread scraps, and tangles in the hook or bobbin area can cause skipped stitches. This debris accumulates quickly, especially when sewing with cotton or multiple fabric layers.
A practical approach is to clean the bobbin area every few projects, or immediately if you notice skipped stitches or thread bunching that persists after rethreading. If you work with heavy fabrics, multiple layers, or cotton frequently, clean more often — lint builds up faster under these conditions.
Clean the bobbin area regularly with a lint brush (paid link)See on Amazon — a small, angled brush with soft bristles made for cleaning machine parts without scratching. A basic lint brush is cheap and effective for clearing debris from bobbin cases, feed dogs, and tight spaces. It’s sufficient for routine cleaning.
Oil only if your manual explicitly says to. Many contemporary machines are self-lubricating and need no user-applied oil. If yours requires oil in the bobbin case area, use proper sewing machine oil (paid link)See on Amazon — a tiny amount, applied precisely as the manual directs. Over-oiling is a common error that can get lubricant on fabric feed surfaces, creating new problems. Sewing machine oil usually comes in a small bottle with a fine nozzle for accuracy. Your manual specifies if, where, and how often to oil; many modern machines are sealed and need none. Do not oil the bobbin itself. Its main requirement is to be the correct type, sitting properly in the slot.
Bobbin Type Reference
| Bobbin Type | Approx. Height | Common Machine Examples | Notes |
|---|---|---|---|
| Class 15 | ~12mm | Many modern Brother, Janome, Singer | Check specific model manual |
| Class 66 | Similar to Class 15 | Some older Singer models | Distinct curved profile; not interchangeable with Class 15 |
| L-Style | Varies | Some Pfaff, Husqvarna Viking | Check model-specific requirements |
Final Check and Next Steps
The essence is straightforward: don’t choose a bobbin by name alone. Measure the one that works, or consult your manual for the precise dimensions your machine requires. Class 15 and Class 66 are not interchangeable despite visual similarities — the profile is the critical difference. L-style is often entirely distinct.
Using the wrong bobbin is a frequently overlooked cause of tension and stitch problems, yet it’s among the cheapest to correct. Before arranging a service or suspecting machine failure, verify the bobbin. It’s a quick check that could save a repair bill.
If you want a systematic guide for troubleshooting tension and stitch faults in the correct sequence, get the free Sew and Fix Fault-Finding Checklist. It guides you through checks from the top thread down, ensuring nothing is missed.
Once you’ve identified the correct bobbin, the next step is loading it properly. Our threading hub covers that in detail.
References
- Setting Up A Sewing Machine - The Haberdasher Bee
- Why is my sewing machine skipping stitches? - Vicky Myers Creations
- Recommended Sewing Supplies & Equipment. - Sew School
As an Amazon Associate we earn from qualifying purchases. The products linked above are ones we think are worth a look.
Note: General guidance only, verify details with a qualified professional or official source.