Sewing Machine Stitch Problems: What to Check First, and in What Order
As an Amazon Associate we earn from qualifying purchases. Some links on this page are affiliate links, which means we may earn a small commission if you make a purchase.
When a stitch fault appears, the cheapest and easiest fixes should be tried first. Checking the needle, rethreading, and verifying the bobbin are quick, low-risk actions that cost nothing but a few minutes. Adjusting the machine’s timing, by contrast, is a complex service job. This order reflects that cost-and-risk hierarchy, not a statistical distribution of faults.
You’re halfway through a hem on a pair of jeans. The machine has been humming along nicely. Then—a crunch, a clunk, and underneath the presser foot there’s a tangled nest of thread that looks like something a bird started and gave up on. The fabric has stopped moving. The stitches you laid down a moment ago are already uneven, missing entirely, or the thread has snapped clean through.
You’re now sitting at a machine that feels like it’s broken. You’re wondering whether you’ve done something irreversible, whether you need to call someone, or whether the whole thing is a waste of twenty quid at the charity shop.
Here’s what most troubleshooting pages don’t tell you: the machine is almost certainly fine. The reason problems keep coming back is that people work through the checks in the wrong order, give up after one try, or start adjusting things that don’t need adjusting.
This is the order that actually works. Work through it, and you’ll fix the problem yourself more often than not.
Start Here: Rethread the Machine
Incorrect threading is a common cause of stitch failure. It is not a loose screw, a worn part, or the bobbin; it is the thread path.
📺 Watch: Troubleshooting 3 Common Sewing Machine Problems
The specific errors people hit are almost always the same. They miss a thread guide without realising it. They thread the machine with the presser foot down, which leaves the tension discs open and the thread sitting loose between them. They load the bobbin the wrong way round. They let the thread jump off the spool pin mid-seam. Any of these will produce exactly the symptoms you’re seeing—a bird’s nest underneath, skipped stitches, or thread snapping near the needle.
The single most important habit: raise the presser foot every time you rethread. When the foot is up, the tension discs open. When you lower the foot, they close and grip the thread correctly. Threading with the foot down means the thread sits in the groove rather than between the discs—and from that point on, nothing the machine does will be right.
So the fix isn’t a new part or a service call. It’s a full rethread: take the thread completely out, raise the presser foot, and follow your machine’s threading path from spool pin to needle eye, making sure the thread passes through every guide and the take-up lever. Then test on a scrap of the same fabric before you go anywhere near the seam.
The thread path matters more than most people realise. A quick way to check you haven’t missed a guide: follow the thread back from the needle with your fingertips. If you feel a guide your fingers reach but your thread didn’t pass through, that’s your problem. Grab the manual and check your machine’s threading diagram against it rather than relying on memory.
This is the check that solves many problems and costs nothing. Always do it first.
Next Step: Replace the Needle
If rethreading didn’t fix it—or if it helped but the problem came back—the needle is next.
A bent, dull, or wrong-type needle is another frequent cause of skipped stitches, thread breakage, and puckering. Needles wear out. After sewing on heavier fabrics like denim or layered canvas, the tip can dull or bend in ways you can’t always see with the naked eye. A needle that’s been used on several projects will cause problems even if it looks okay.
The needle type also matters as much as its condition. A general-purpose sharp needle used on a stretch knit will skip stitches, snag the fibres, and ladder the fabric—not because the needle is blunt, but because it’s the wrong design for that fabric. A ballpoint needle parts the knit fibres; a sharp needle punches through them.
Many UK domestic machines use the 130/705 H system needle, which is widely available. Your manual will tell you which system your machine uses. From there, pick the needle type that matches your fabric: ballpoint or stretch for knits, microtex or sharp for tightly woven fabrics, and a denim needle for heavy layers.
The practical starting point for most home sewers is a mixed-size pack. Schmetz Universal Needles Assorted (paid link) is widely stocked in the UK and mixes 70/10, 80/12, 90/14 and 100/16 in one packet—useful when you’re swapping between a lightweight chiffon and a pair of jeans in the same session. A pack like this is a dependable everyday choice.
Check Schmetz Universal Needles Assorted price → (paid link)
Needles cost very little and fix more than any adjustment. This is the point in the order where the problem is usually solved.
Check the Bobbin and Tension
Thread nesting underneath, loops that won’t sit flat, or a bobbin that seems to pull the thread down through the fabric—these point to the bobbin area.
The bobbin system your machine uses matters here. A top-loading drop-in bobbin slides in horizontally, with the thread unwinding in a specific direction that varies by model—check your manual. A front-loading bobbin sits inside a removable bobbin case, and the thread path is different again—it needs to be pulled through a small slot on the case, not just dropped in.
These two systems are not interchangeable. A bobbin that fits one machine may look similar to another but sit at the wrong height or unwind the wrong way. Using the wrong bobbin is a common mistake and one that causes persistent problems no amount of tension adjustment will fix.
Check three things: that you’re using the correct bobbin for your machine (your manual or the maker’s website will confirm the model number), that it’s wound evenly with no loose patches or tight spots, and that it’s inserted in the right direction and seated properly in its housing.
Singer Class 15 Bobbins (paid link) are a common size for Singer machines and many compatible models. The clear plastic means you can see how much thread is left without fishing the bobbin out, which is genuinely useful when you’re halfway through a project.
Check Singer Class 15 Bobbins price → (paid link)
When both the top thread and bobbin thread are seated correctly and under the right tension, they interlock in the middle of the fabric. The result is a smooth, flat line of stitches on both sides. If the stitches look pulled or uneven, that’s tension—and it’s almost always quicker to check the preceding three items before you touch the dial.
Adjust one tension at a time and test after each small turn. If loops appear on the underside, the top thread tension is too loose. If they appear on top, the bobbin thread tension is pulling the top thread through. Don’t invent a number from memory—start from your manual’s stated setting and move in small increments from there.
Test Stitching and Fabric Considerations
Once you’ve worked through the threading, the needle, and the bobbin, and the stitches are still not right—puckered, pulled, or uneven—it’s worth testing on a scrap of the same fabric before you commit to the seam.
This is the step most people skip because they’re in a hurry. It’s also the step that prevents a ruined seam on good fabric.
The sample tells you whether the needle size is right for the fabric weight, whether the thread is suited to the project, and whether the tension sits correctly before you’ve put a single stitch into the actual garment. If the fabric puckers, try reducing the top thread tension slightly and shortening the stitch length. If the stitches look flat but the fabric feels stiff, the tension may be too tight for that cloth.
Using the correct presser foot matters here too. A standard zigzag foot handles most tasks, but a walking foot helps on very slippery or layered fabrics, and a roller foot can make a difference on leather or vinyl. These aren’t gadgets—they’re the right tool for specific situations, and your manual will tell you which foot fits your machine.
Schmetz Microtex Needles (paid link) are worth knowing about if you’re working on fine or tightly woven fabrics—silk, microfibres, lining taffeta. The slim, acute point penetrates cleanly without distorting the weave, which matters when you’re trying to get accurate stitch placement, such as straight topstitching. They’re not for knits, where a ballpoint or stretch needle is the safer choice.
View Schmetz Microtex Needles on Amazon → (paid link)
The sample test is a habit worth building. Once you’ve confirmed the set-up works on a scrap, the rest of the project goes smoothly.
When to Stop and Seek Professional Help
Work through the checks above—rethread, new needle, bobbin, tension, sample—and most stitch problems will be resolved.
If the machine continues to misbehave after all of those steps, the issue is likely internal and beyond what a user can fix at home. Worn bearings, a damaged needle bar, or a seized tension assembly are mechanical faults that require a professional service. This is the honest point to stop and seek help rather than keep adjusting things.
Regular cleaning helps prevent this stage arriving early. Lint and thread debris accumulate around the hook, feed dogs, and needle plate, and this buildup can contribute to symptoms such as skipped stitches or tangles. A practical rule of thumb is to clean after every project or every eight hours of sewing—a lint brush and a small cleaning kit are inexpensive and make a difference that compounds over time.
The caveat that most pages skip: do not oil unless the manual specifically says to. Many modern machines are factory-lubricated or have sealed bearings and should not be oiled. If yours does need oiling, use only the type your manual specifies and apply it only at the points it names. Hemline Sewing Machine Oil (paid link) is a widely available option for machines that do need it—the small bottle makes it easy to apply oil precisely to the points that matter.
Check Hemline Sewing Machine Oil price → (paid link)
A professional service is worth it once the simple checks are exhausted. Don’t skip those checks and go straight to a service call—a repairer will usually begin with basic checks.
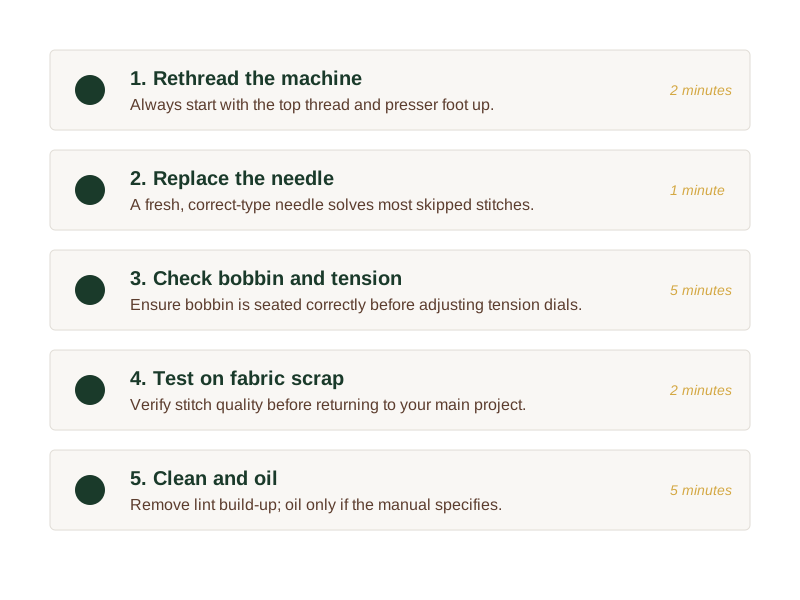
Before you change anything, turn the fabric over: loops underneath point to the top thread, and that is where the free Sew and Fix Fault-Finding Checklist starts too. The troubleshooting sequence is to first rethread the machine, then replace the needle, check the bobbin and tension, test on a fabric scrap, and finally clean and oil the machine if needed.
The truth is that most stitch faults are threading, needle, or bobbin. Fix those in order, and the machine works.
Frequently Asked Questions
How often should I clean my sewing machine?
After every project or roughly every eight hours of sewing is a practical working rhythm. Lint and short thread fibres accumulate around the feed dogs, the bobbin area, and the needle plate, and this buildup interferes with the hook mechanism and can cause skipped stitches or thread tangles. A small lint brush and a wipe-down takes only a few minutes and requires inexpensive basic supplies.
Can I use any oil in my sewing machine?
No. Only use the oil specified in your machine’s manual. Many modern domestic machines are factory-lubricated or have sealed bearings and should not be oiled at all—adding oil to a sealed machine can attract lint and cause blockages rather than preventing them. If your manual permits oiling, apply it only at the points it names and only in the quantity it specifies.
What is the correct tension setting?
The correct setting is the one that produces smooth, flat stitches on both sides of the fabric. Your manual will state a starting point—use that rather than inventing a number. Adjust in small increments and test after each turn. If the top thread tension is too loose, you’ll see loops underneath. If it’s too tight, the bobbin thread will pull through to the top and the fabric may pucker.
Why is my thread bunching up underneath?
A thread nest or bird’s nest underneath the fabric often indicates an upper-threading problem. Rethread the machine completely with the presser foot raised, making sure the thread passes through every guide and the take-up lever. If the problem persists after rethreading, check that the needle is seated correctly and is not bent or blunt.
Explore More Topics
Quick answers:
Go deeper on specific topics:
- Why Is My Sewing Machine Skipping Stitches?
- How to Fix Sewing Machine Tension Problems: Top Thread and Bobbin
- Why Is My Sewing Machine Thread Bunching or Looping Underneath?
- Why Does My Sewing Machine Keep Breaking Thread or Needles?
- Why Is My Sewing Machine Not Feeding the Fabric?
- How to Free a Jammed Sewing Machine When the Fabric or Needle Is Stuck
- Why Is My Sewing Machine Skipping Stitches on Stretch Fabric?
- Why Is My Sewing Machine Skipping Stitches on Thick Fabric or Denim?
- Why Is My Sewing Machine Skipping Stitches When Using Zigzag Stitch?
- How to Adjust Bobbin Tension on a Sewing Machine
- Why Is My Sewing Machine Fabric Not Feeding on Stretch Fabric?
- Why Is My Sewing Machine Fabric Not Feeding on Thick Layers?
If you’ve worked through every solution here and the fault persists, the one remaining cause that typically requires a technician is internal hook timing—this is the point to stop self-diagnosing and book a service.
Sources & Further Reading
- 17 Common Sewing Machine Problems and How To Solve Them
- 7 Easy Ways to Fix Stitch Quality Problems - Sew Essential
- Sewing Machine Troubleshooting Guide
As an Amazon Associate we earn from qualifying purchases. The products linked above are ones we think are worth a look.
Note: General guidance only, verify details with a qualified professional or official source.