Why Is My Sewing Machine Skipping Stitches?
As an Amazon Associate we earn from qualifying purchases. Some links on this page are affiliate links, which means we may earn a small commission if you make a purchase.
A sewing machine that skips every third or fourth stitch points to a different underlying problem than one that drops stitches randomly. Recognising the pattern before reaching for the tension dial is the only reliable approach to fixing the issue permanently.
A damaged, incorrectly installed, or unsuitable needle is a common cause of skipped stitches on domestic machines. Not tension, not timing, not the bobbin — the needle itself. A bent, blunt, or wrong-type needle fails to form the thread loop that the hook needs to catch. Fix that first, and the problem usually disappears. Everything else in this guide matters, but the needle check comes before all of it.
Identifying the Root Cause
The relationship between needle movement and stitch formation is mechanical. When the needle pushes through fabric, it carries a loop of top thread down with it. The hook (the rotating part underneath) catches that loop and wraps the bobbin thread through it to form a lockstitch. If the needle is bent, the loop forms off-centre and the hook misses it entirely. If the needle is blunt, the thread drags and the loop never forms properly. Either way, the stitch doesn’t happen.
Manufacturer troubleshooting guidance consistently lists needle condition as a primary area to check before moving on to threading, tension, or bobbin issues. Many online guides overlook this fundamental step.
Beyond being bent or dull, the needle might simply be the wrong type for what you’re sewing. A universal needle with its slightly rounded point works well on woven fabrics but can push through the yarns of a jersey instead of parting them, causing skipped stitches and runs. Using a standard ballpoint on a high-elasticity fabric like Lycra is another version of the same problem — the needle type and the fabric type have to match.
Needles also wear out with use. SCHMETZ, a leading manufacturer, recommends needle replacement after approximately eight hours of sewing or at the start of a new project, though this varies with fabric density. A heavy seam through denim puts more stress on the needle than a light hem. The practical signal is this: if stitches start skipping and nothing else has changed on your machine, swap the needle before doing anything else. Needles are generally inexpensive and quick to replace. A professional service usually costs more than replacing a needle — and people do pay for services only to have the technician’s first move be swapping a bent needle.
Checking and Fitting a Needle
The checks are quick:
- Switch off and unplug the machine.
- Lower the needle to its lowest point using the hand-wheel.
- Loosen the needle clamp screw and pull the needle out.
- Look at it against the light — any bend, any flattened tip, any burr on the sides of the eye means replace it.
- Fit the new needle with the flat side facing the back of the machine and the long groove (the channel that guides the thread) facing towards you.
- Push it up until it stops, then tighten the clamp firmly.
If you’re not sure whether the needle is wrong for your fabric, check the guide below or look in your machine manual — most specify the needle system (usually 130/705 H for domestic machines) and give fabric recommendations.
Download the Free Sew and Fix Fault-Finding Checklist to keep these steps at hand.
Re-examining the Thread Path
If a new needle doesn’t solve it, the next area to investigate is the threading. Incorrect threading is another common cause of skipped stitches, and the fix takes two minutes if you do it properly.
The top thread has to pass through a specific sequence of guides, discs and levers before it reaches the needle. Each one matters. The most frequently missed step is the take-up lever — the part near the top of the machine that moves up and down with each stitch. If the thread isn’t seated in the take-up lever correctly, the thread isn’t drawn through the fabric evenly, and the loop that the hook needs to catch either forms too small or doesn’t form at all.
Thread not seated in the tension discs is the other common version. The tension discs sit above the needle area and regulate how much drag the top thread faces. When the presser foot is down, the discs close around the thread. If you raise the presser foot before threading — which you should — the discs open and the thread drops between them cleanly. Thread the machine with the presser foot up, then lower it before you start sewing.
The rethread process is simple in principle but the order matters:
- Raise the presser foot.
- Unthread the machine completely — remove the thread from the spool, the tension area, the take-up lever, the thread guides, and the needle.
- Re-thread from the spool, making sure each guide and the take-up lever are properly engaged. Pull the thread through with the presser foot raised.
- Lower the presser foot.
- Hold the thread tail behind the needle, lower the needle by hand-wheel (not the pedal) to its lowest point, then raise it — this brings the take-up lever up and picks up the bobbin thread.
- Pull both threads to the back of the machine under the presser foot.
That last step — picking up the bobbin thread by hand before you start — is the test. If you can’t get a loop of bobbin thread appearing above the needle plate when you do this, something in the threading is still wrong. Don’t start sewing until it works by hand, because it won’t work by machine either.
For a full walkthrough of the threading path on your specific machine, the maker’s manual is the right reference — threading sequences differ between models, particularly between front-loading and top-loading machines.
Bobbin Condition and Lint Buildup
A correctly threaded top thread needs a correctly installed bobbin to form a stitch. If the bobbin isn’t sitting properly in its housing, if the thread is wound unevenly, or if there’s lint blocking the path, the bobbin thread won’t release cleanly — and without that second thread, there’s no stitch to skip, it’s just one thread pulling through.
Unevenly wound bobbins are a common source of trouble. If one part of the bobbin is wound tighter than another, the thread comes off at an inconsistent rate. The stitch tension varies from one part of the seam to the next, and skipped stitches are one symptom. Wind bobbins slowly and evenly, and if a bobbin has been sitting wound for a while and looks lumpy or tight in places, rewind it.
Lint is the other quiet cause. Every time you sew, the machine sheds tiny fibres — cotton particularly. Over months and years these collect in the bobbin area, around the hook, and in the feed dog channels. A visible build-up of lint in the bobbin race can physically obstruct the bobbin thread, disrupting the stitch formation even when everything else is threaded correctly. Cleaning it out is straightforward: remove the bobbin, brush away the lint with a lint brush (paid link)See on Amazon or a dry, soft brush, and wipe around the bobbin housing. Don’t use anything damp, and don’t oil the bobbin area unless your manual specifically says to.
Top-loading drop-in bobbins and front-loading bobbin cases are not interchangeable even when they look similar. Different bobbin types may not be interchangeable and can cause poor stitching. Check your manual for the exact bobbin type your machine requires.
Clearing lint may improve stitch consistency when lint is obstructing the thread path — it’s a simple fix that can resolve issues that accumulated over time.
Needle, Thread and Fabric Compatibility
Even with a fresh needle and correct threading, skipped stitches can come back if the needle isn’t suited to the fabric, or if the thread isn’t suited to the needle.
📺 Watch: Skipped Stitches when Sewing? Check that Needle!!
Using a standard universal needle on stretch fabric is the version of this that comes up most often. Knit fabrics — jersey, interlock, T-shirt material — have a structure that flexes under the needle. A universal needle pierces the yarns rather than parting them, and on a stretch fabric that means the fabric puckers, the needle can snag, and the thread loop doesn’t form cleanly. A ballpoint needle (paid link)See on Amazon pushes between the yarns, and a stretch needle (which has a slightly different scarf design and a more rounded tip) is made for high-elasticity fabrics like Lycra, swimwear and sportswear. Swapping to the right needle type often fixes stretch fabric skipping entirely.
Denim and heavy woven fabrics present the opposite problem: a standard needle may not be strong enough to pierce the fabric cleanly at speed. The needle deflects, the loop misfires, stitches drop. A jeans needle (paid link)See on Amazon (sometimes called a denim needle) has a sharper, stronger point and a reinforced shaft — it penetrates densely woven fabric without deflecting, and it handles multiple layers at seams much better than a general-purpose needle. Owners working through several layers of denim with a standard needle often report persistent skipping and thread breaks that stop the moment they switch to a jeans needle in the right size.
Thread quality matters too. A low-quality thread can fray during sewing, shedding fibres that build up as lint and disrupting the thread path. It can also slip through the tension mechanism inconsistently. Using recognised brands like Gutermann, Coats, or Amann can provide more consistent results than the cheapest option.
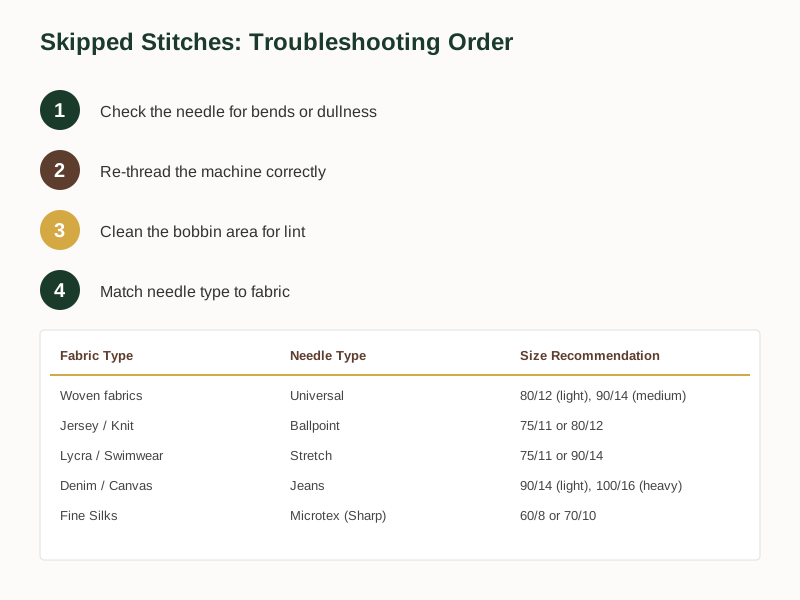
For general purpose woven fabrics, use a Universal needle in size 80/12 for light fabrics or 90/14 for medium. For jersey or single-knit T-shirt material, a Ballpoint needle in size 75/11 or 80/12 is recommended. For high-elasticity knits like Lycra or swimwear, use a Stretch needle in size 75/11 or 90/14. For denim, canvas, or heavy twill, a Jeans needle in size 90/14 for lighter denim or 100/16 for heavy layers is suitable. For fine silks, microfibres, or batiks, a Microtex (sharp) needle in size 60/8 or 70/10 is best.
If you’re unsure which needle type your fabric needs, the machine manual usually has a fabric-to-needle chart. It’s worth keeping it to hand — matching the needle is a cheap fix with a high success rate.
Seeking Professional Help
If a new needle, correct threading, a clean bobbin area and the right needle type for the fabric haven’t solved the skipping, stop here. Continued skipping across different fabrics and thread types points to something inside the machine that needs professional attention — and this is where home fixing stops.
The specific sign to watch for is the needle striking the hook. If you can hear or see the needle making contact with the hook assembly as it rotates, the timing between the needle and hook may have drifted. That is not an adjustment you can make reliably at home. It requires the right tools, the right knowledge, and an understanding of the specific machine — and making it worse by guessing is genuinely possible.
Do not oil a modern machine unless its manual explicitly says to. Many electronic domestic machines are sealed or have specific professional-only lubrication requirements. Applying oil to a machine that shouldn’t have it — even small amounts in the wrong place — can gum up the hook mechanism and create more problems than it solves. If you’ve been using a general-purpose lubricant like WD-40, stop, and get the machine looked at before the residue causes damage.
Also off-limits for home repair: opening the electrical housing, rewiring the foot pedal or power lead, and adjusting hook timing. These are safety issues as well as mechanical ones. A qualified service engineer handles them.
Professional servicing generally costs more than replacing a needle, which is exactly why the needle check comes first. If the machine is worth servicing — and most decent domestic machines are — then book it. But start with the cheap checks, because more often than not, they work.
For questions about your specific machine or to arrange a service, get in touch .
Common Questions Answered
Why is my sewing machine skipping stitches on stretch fabric?
Stretch fabrics require a ballpoint or stretch needle to prevent the needle from piercing the yarns. A standard universal needle can cause skipped stitches on jersey, Lycra or other knits because it deflects the loop formation. Try a ballpoint needle first for standard jersey, or a stretch needle for high-elasticity fabrics like swimwear or activewear.
Why is my sewing machine skipping stitches on the underside of the fabric?
Skipping on the underside is usually a bobbin issue — either the bobbin isn’t inserted correctly, there’s lint obstructing the bobbin thread path, or the bobbin thread tension is too loose. Remove the bobbin, check for lint, clean the bobbin race, and reinsert the bobbin in the direction shown in your manual. If it continues, check that you’re using the correct bobbin type for your machine.
How often should I change my sewing machine needle?
SCHMETZ recommends changing the needle after approximately eight hours of sewing. If you’re working with heavy fabrics, dense seams or sticky materials like leather, change more frequently — the needle dulls faster under those conditions. If stitches start skipping and nothing else on the machine has changed, the needle is the first thing to swap.
The order matters more than most guides admit. Check the needle first, then the threading, then the bobbin — only then should you consider tension or a service. A bent, incorrectly installed, or unsuitable needle is a common cause of skipped stitches on domestic machines. Check the needle before adjusting the tension dial. Work through these steps before you call anyone, and in most cases you won’t need to.
Skipping that comes back after a new needle usually means the needle is the wrong type, not a dud. The free Sew and Fix Fault-Finding Checklist pairs each fabric with its needle, so it is worth a look before the next project.
The one cause of skipping that no home fix can address is hook timing drift — when the mechanical synchronisation between needle and hook has shifted. Our Sewing Machine Stitch Problems hub helps you determine whether you’ve reached that point.
Related Guides
References and Resources
- Why is my sewing machine skipping stitches? - Vicky Myers Creations
- Why Is My Sewing Machine Skipping Stitches? Solved
- Sewing Machine Skipping Stitches - How to Fix It - The Sewing Studio
Note: General guidance only, verify details with a qualified professional or official source.